Saturday, December 29, 2012

Coffee Filter Snowflakes Tutorial


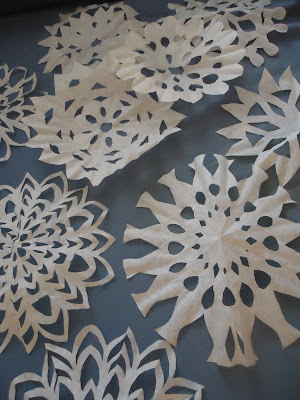
A while back, I was given a pack of old coffee filters from my husband's grandmother. We already had plenty of coffee filters and since I didn't know how old they actually were, I figured I just put them up and use them for some kind of craft, like flowers or something.  So recently, I got them out and decided to make some snowflakes with them and they turned out super cute!  I cut out several different shapes.


 scalloped snowflakes


spiky edges


 I hung some from the chandelier in the dining room.


Look at this cute snowflake garland!


This is a very easy and cheap winter craft and perfect for kids too.  To make the snowflakes just fold a coffee filter in half, then half again, then half again.... and then again. You will be left with a little wedge. Cut around the sides of the wedge to form the shape of your snowflake and then unfold and see your beautiful snowflake appear.  If you want to add color to them, watercolors would work great or you could add some glitter or spray shimmer mist on them.  

Here is a link to my tutorial that is a little more detailed:

Coffee Filter Snowflakes Tutorial

Happy Crafting :)
Pin It!

Tuesday, November 27, 2012

Cone Shaped Christmas Tree Decor

I love the embellished, cone shaped Christmas trees I have been seeing for the past few years and what I love most about them is that you don't have to go out and buy the "cone shaped form" to make one of these pretty trees.  You could actually just use chipboard or poster board and make your own cone shape and then decorate or embellish it however you like. I have been working on a few of my own cone shaped Christmas trees and will be sure to post pictures when I am finished.. but until then, I wanted to share some that I found online that were very inspiring to me.  I believe all of these have the tutorials as well :)


First up are these gorgeous fabric covered trees that I found over at The Creative Exchange... LOVE them!


I love these pretty trees that I found over at Hero Arts. With the selection of beautiful papers out there.. the possibilities are endless!


oh.. my Goodness! LOVE these pretty glittered ones over at eighteen25.  I really love how they sit on the pillar candle holders... very cute! Just FYI: You can get the Styrofoam forms like the ones used in this pic AND the candle holders over at the Dollar Tree for a buck a piece!


Be still my beating heart!! I have fallen in love with these gorgeous sparkly, ruffly trees over at Kate Landers Events, LLC.


Have a look at this GORGEOUS vintage embellished cone shaped tree from My Love of Style. Oh, my gosh... it's stunning!


This is just a few of the beautiful decorated cone Christmas trees out there.. I hope you have enjoyed this little round up and that they have inspired you as much as they have me.  Thank you to all of the talented ladies out there who made these beautiful trees :) 

If you are wanting to make your own cones instead of buying the cone shape form, I found the instructions over at The Creativity Exchange to be very helpful and love how my cones came out!

Thank you so much for dropping by :)
Pin It!

Monday, November 19, 2012

7 Easy Pine Cone Crafts for the Holidays

Recently I have been thinking about pine cones and how perfect they are for crafting and home decorating for the holidays.. so it prompted me to look and see what pine cone crafts were out there.. and there were TONS and most of these even have the tutorials as well :)   Here are six of my favorites:


I love this beautiful pine cone garland that I found at organize & decorate everything.


I love this pine cone wreath over at u create via V and Co.


I love these beautiful, bright colored pine cones over at HGTV. 
There isn't a formal tutorial but looks to me like you could just dip them in bright colored paints, paint it on with acrylics using a brush or even spray them with spray paint. There is a video tutorial to something similar at the link though :)


Another gorgeous pine cone craft over at Crafts Unleashed


Have a look at this GORGEOUS pine cone tree over at Life on Lakeshore Drive.


 Smile Monsters has shared these pretty pine cone decorations!


I fell in love with these gorgeous and so SIMPLE to make, pine cone candle holders that I found at Crissy's Crafts!


For even more pine cone craft and decoration ideas... see my pine cone crafts and decor round-up right here.

I hope you have enjoyed this round-up of holiday pine cone crafts! Thank you so much for dropping by:)


Linking to this fab party:
Life on Lakeshore Drive
Pin It!

Saturday, November 10, 2012

Easy Fabric Flowers from Old T-shirts

Fabric flowers from old t-shirts


 Do you have any pieces of old clothing that you need to get rid of but they really aren't even fit for Goodwill?  Here's what you do: Cut them up and make some of these gorgeous fabric flowers with them... I did this with a few t-shirts recently and I'm HOOKED!  I wish I had some more old clothes.. I would love to try to make these out of all kinds of different materials.. because I'm sure each flower would look different when you use different types of material. 

Here is a few different things you can use to make these.. old or damaged:
  • shirts
  •  jeans
  • slacks
  •  dress shirts
  • sheets or pillowcases
  • towels
  • handkerchiefs
  • fabric remnants
  • curtains
  • shower curtains
  • fabric remnants

  The technique to make each one is the same but there are things you can do to vary the look of them. These particular ones were made with just a regular straight edged strip of material that was about 1.5 inches wide by about a yard (my t-shirts are large). I did a running stitch down one edge, gathered the strip and and then rolled them together,  just like if you were making cinnamon rolls.  Once rolled, I glued each one to a felt circle and viola!

rolled fabric flowers from old t-shirts

The width and length of each strip will determine the size. I wouldn't recommend using a strip that is over 2 inches wide because then it just looks kind of floppy..The length of the strip will determine the size. The longer, the larger your flower will be. You can use multiple shorter strips to make one longer strip.

 Here is another photo of some more made the same way.......


These were made the exact same way but I cut a scalloped edge on each one, sewed, gathered and rolled.


If you take the strip and instead of on one edge cutting scallops, cut horizontal strips all the way down, and then stitch and roll....you will come out with something like this:


I like this one because it kind of looks like a  little pom pom.. to make it even more realistic you can do the same thing but cut pointed edges on each strip.  I think it would come out looking sort of like a dahlia or other flowers that look similar to that.

So you can definitely come up with all kinds of different looks depending on how you decide to do one edge of the strip before doing the stitch.  I love playing around and seeing what I can come up with.

Of course, the best thing I love about these is that they were virtually free to make.. so next time you get ready to throw out that old ripped shirt, keep it and make some pretty flowers!!


I hope you enjoyed this post.. if you are interested in a more detailed tutorial along with lots of ideas about what you can do with your finished flowers, see my tutorial here

Thank you so much for dropping by!


Pin It!

Wednesday, October 17, 2012

Shopping Bag Ghost Tutorial - Guest Post


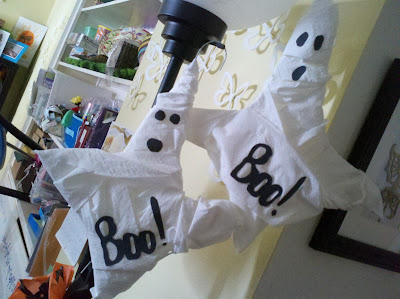
Look at these cute shopping bag ghosts that my friend Sunny made... and she was nice enough to share the tutorial!


Shopping bag ghost tutorial:

I was inspired to make a Halloween wreath using a wire hanger and cut up plastic tablecloths and trash bags (turned out much more fabulous than that sounds)...and I got to thinking...what else could I make with these free/low-cost everyday items?

I played around with twisting the wire hanger and got a ghost shape. At first, I wrapped toilet paper around (you could also use white streamers) and cut out black construction paper for the eyes and mouth and "Boo!". Simple and cute. But would it last long as an outdoor decoration? Maybe not. So I thought about using a white trash bag but...what about a plastic grocery bag! I had tons of those and the sheerness of it might make for an interesting ghost. Plus - it's upcycling (instead of using a new kitchen trash bag, I could use up some of the many grocery bags we accumulate every month - sorry Earth!).


First, I simply cut off the part with the store name, leaving only solid white plastic. Using two bags, I wrapped and strategically taped until I was satisfied with the ghostliness of it. Then I used double-stick tape to put scraps of black trash bag (leftover from the wreath) to form the eyes and mouth. You could probably also just use a black Sharpie and get the same effect. And there you go - from grocery bag to ghost in less than 10 minutes! And the great thing about using a wire hanger is that it comes ready made with a hook for hanging!

Hope you try it and Happy Halloween!!
Sunny
 and look at this one made with wire hanger and toilet paper:

 If you get a chance, please visit my friend Sunny on HubPages :)

also, if you get a chance drop by and see my Halloween wreath tutorial using a wire hanger!

Thank you so much for dropping by! 

Jamie

Pin It!

Thursday, October 11, 2012

Halloween Garland Made From Cereal Boxes!

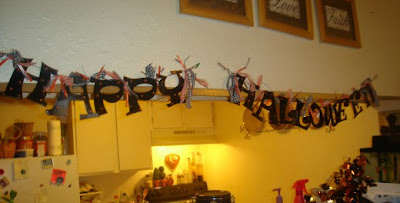
Happy Halloween Garland

Here is a pic of the "Happy Halloween" garland I made...   The letters were cut out of saved cereal boxes.... I LOVE cereal boxes.. it's the BEST crafting material and you can pretty much get it for free :)  Anyway, I cut the letters out, using the font Ravie and painted them black and put orange polka dots on them. I then glued them to a piece of jute and tied strips of gingham patterned material and also various Halloween colors of ribbon in between each letter.  This was super easy, cheap to make and I'm really happy with how it turned out.  What do you think??

If you are interested in a more detailed tutorial, click here.

Thank you for dropping by!

Jamie

Linked up at:
fall link party
Pin It!

Saturday, October 6, 2012

Free Printables- Bright Colored Papers


Above is an example of some of my free printables in bright, vibrant colors... I made LOTS of them and they are all available for download for free!  Use them to do scrapbooking, paper crafts or anything you like.

Pin It!

Sunday, September 16, 2012

Paper Rose with Scalloped Edges Tutorial

rolled roses
scalloped edge rolled roses


I love the cute spiral cut paper roses...I just got back into making them again.   Here is the tutorial I shared a couple years ago after I first started making but recently I have been making them using a different technique- instead of cutting just a plain spiral, I used some scalloped scissors to cut the spiral and they turned out super cute!  I keep on making them and I have no idea what I will use them for LOL! But.. I'll use them for something, I am sure :)

I wanted to do a little post just to show how CUTE and EASY these are... I made all of these out of colored card stock. This particular cardstock worked great because it wasn't too thick.


Easy Paper Rose Tutorial


Start out with a 6x6 inch square and cut it into a circle. 


Then get the scalloped scissors and starting on the edge start to cut a spiral into the circle, cutting around and towards the middle.  I try to leave about an inch between the edges when I'm cutting.  I taper the end and this will leave a scalloped circle cut out in the middle. I then cut off the tapered outside edge.  It should end up looking something like this.


Then I start rolling it tightly toward the middle.  Keep going until you get to the end and then let it uncurl just a little bit... you don't want it to uncurl too much.


Now, take the glue gun and put a glob of glue on the circle (that was left after cutting the spiral) and then take the flower and stick it right down into the glob of glue.   Make sure the end of the spiral is glued down to the side of the flower and trim up the bottom circle if you need to. 


You should now have a pretty scalloped rose!


I hope you enjoyed the tutorial... These flowers are a bit on the smaller size.. If you want larger ones, try starting out with a square that is 8x8 or even 12x12.  Always try and cut your spiral evenly, all the way to the middle.  Also, if you use regular scissors and cut just a plain spiral and then cut large scallops all around it like this:

cut wide scallops
Then you end up with this look:


Thank you for dropping by and please stay tuned for more cute stuff to come :)

Jamie


Pin It!

Tuesday, September 11, 2012

Remembering


Remembering the victims and their families. 


Please feel free to take this graphic for your own website, blog etc.
Pin It!

Wednesday, September 5, 2012

Easy Crepe Paper Carnations Tutorial

crepe paper carnations


I was going through some boxes in my closet and found a few packages of streamers I had forgotten about.   I decided to get them out and see what I could do with them.  I'm always working with paper and fabric strips trying to make flowers so I thought these streamers may make a cute flower. I ended up putting a stitch down the edge, gathering them and rolling them up. They turned out really cute, just like carnations!  I also made some rolled flowers or cabbage roses, I think they call them, which turned out really cute too.  I decided to do a tutorial on how to make each of these.  There is a link to it at the end of this post.

Here are some more photos:


Here is some photos of the crepe paper rolled flowers aka cabbage flowers:

crepe paper cabbage flowers or rolled flowers

crepe paper rolled flowers

a couple of stacked rolled flowers


close up of 2 crepe paper rolled flowers stacked- this adds dimension


Pin It!